
So you have a leaky faucet? It is indeed more than just a dripping sound disturbing your sleep at night. It is also adding strain to your plumbing system. Whether you’re dealing with this problem in your kitchen, bathroom or the faucet in your garden need repair, or you need to fix a persistent slow drip faucet, in this comprehensive guide that will covers everything. Learn how to fix a leaky faucet step-by-step using simple instructions and common household tools. With the right approach, your faucet will be as good as new.
How to Fix a Faucet That Drips Unless We Turn It Extremely Tightly
When a faucet only stops leaking if you twist it very tightly, it’s a warning sign. You’re probably wearing down the valve seat or the faucet washer inside the stem. This extra pressure may hold off the drip temporarily, but in reality it’s slowly damaging the faucet.
Such kind of leak is usually fixed by replacing the stem assembly. You’ll need to remove the handle, take out the stem, and inspect both the packing nut and O-ring replacement areas. If any parts are worn or cracked, replace them. This basic faucet stem replacement is part of many plumbing DIY tutorial tasks homeowners tackle. Remember, overtightening can lead to bigger problems later.
How to Fix a Faucet Leak
First, check the type of leak. Is water dripping from the faucet spout, seeping around the handle, or is there a water leak under sink? Every sign tells a different story. A dripping faucet repair often involves worn parts like the faucet washer, O-ring, or internal valve components.
If your single handle faucet repair job involves a cartridge, you’ll remove it and do a faucet cartridge replacement. For double handle faucets, it’s usually a compression faucet repair or ceramic disc faucet fix. Either way, identifying the source is key. This is a real home maintenance guide moment, catch small issues before they grow.

Tools You May Need to Fix Your Faucet
To fix any faucet leak, you need the right plumbing tool kit. Start with a flathead screwdriver, Phillips screwdriver, and an adjustable wrench. Wrap your threads with Teflon tape and lubricate seals using petroleum jelly use. Have extra O-rings, washers, and towels nearby.
These basic tools support any faucet handle removal, stem repair, or washer change. A solid plumbing DIY tutorial always starts with the right preparation. If your toolkit is missing any part, check your local hardware store before starting.
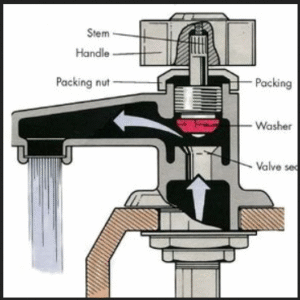
Parts of a Faucet
Knowing your faucet parts diagram helps you understand what you’re fixing. The faucet isn’t just the handle. It includes many small parts that work together to control water flow.
Table: Common Faucet Parts
| Part Number | Name |
| 1 | Decorative button on faucet |
| 2 | Top screw |
| 3 | Faucet handle |
| 4 | Top stem |
| 5 | Packing nut |
| 6 | Nylon washer |
| 7 | Bottom stem |
| 8 | O-ring replacement |
| 9 | Faucet washer |
| 10 | Bottom screw |
| 11 | Aerator |
| 12 | Faucet body |
Each of these has a role. Don’t guess—identify the parts before replacing them.

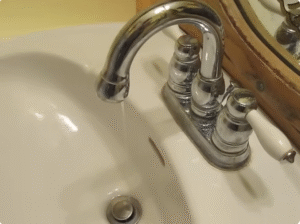
Step 1: Find the Leak
To start, perform water leak detection. Touch around the faucet to feel where it’s wet. Is the leak hot or cold? This will help you know whether you need to fix one handle or both.
If water drips from the spout, the valve seat may be damaged. If water pools around the base, it may be a loose packing nut or cracked O-ring. This step helps focus your effort on what really needs fixing.
Step 2: Turn Off the Water
Never skip this step. Find the turn off water supply valve under the sink. Rotate it clockwise to shut it.
If your home doesn’t have individual shut-offs, you’ll need to shut off the main water valve. Then, open the faucet to let out any remaining water and release pressure.
Step 3: Gather Materials and Prepare the Work Space
Prepare before you open anything. Wrap shiny parts with masking tape to protect them. Place a towel in the sink to catch any dropped pieces.
Lay out all tools and replacement parts before you begin. This avoids running to the store mid-repair. Having everything ready makes the process smoother.
Step 4: Remove the Faucet Handle
Pop off the decorative button on faucet with a screwdriver. Underneath is a screw. Remove it and gently lift the handle.
If the handle is stuck, soak it with vinegar to break down mineral buildup. This step is crucial for faucet handle removal. Forcing it can break parts.
Step 5: Remove the Stem
Now that the handle is off, loosen the packing nut using your adjustable wrench. It might be tight, so try both directions.
After removing the nut, pull out the stem assembly. Check for worn O-ring replacement areas or a damaged faucet washer. These are common failure points.
Step 6: Repair the Leak
Each leak type has its own solution. For handle leaks, wrap the threads below the packing nut with Teflon tape. If it still leaks, replace the nylon washer under the nut.
If the stem leaks, swap out the old O-ring with one coated in petroleum jelly use. For spout drips, change the rubber washer at the bottom. These small repairs are the heart of any good leaky tap fix.
Step 7: Reassemble the Faucet
Add a bit of petroleum jelly use on the threads before tightening. Insert the stem, secure it with the packing nut, and put the handle back on.
Replace the screw and snap the decorative button on faucet into place. Take your time and make sure each part fits snugly.
Step 8: Test Your Work
Turn the water back on slowly. Check the faucet from all angles. Look closely for any signs of leaks.
Test both hot and cold handles. A good plumbing DIY tutorial ends with a test. Make sure you’ve done it right before cleaning up.
Repair Assistance and Bill Adjustments
Many cities offer help for income qualified homeowner assistance programs. These can include free repairs or rebates.
Once you’ve fixed a leak, contact your water provider. Ask about a water bill adjustment. They often lower your bill if you prove the repair.
Tune in to the DIY Universe www.howtoviki
How to Fix a Leaky Faucet Single Handle?
For single-handle faucets, turn off the water, remove the handle, and take out the cartridge. This faucet cartridge replacement is a common fix.
Insert a new cartridge that matches your faucet brand. Reassemble the parts, test it, and you’re done. This is the best route for single handle faucet repair jobs.
How to Fix a Leaky Faucet with Two Handles?
First, identify which side leaks hot or cold. Turn off that side’s valve. Remove the handle, then the stem.
Replace the faucet washer or ceramic disc depending on your faucet type. This method is part of a successful two handle faucet leak solution.
When Should You Change a Leaky Faucet Instead of Repairing It?
If your faucet is rusty, cracked, or leaking in more than one spot, it’s time for a change. Also, if replacement parts are no longer available, upgrading is better.
Repair vs. replace faucet depends on cost, time, and part availability. A new faucet improves style and performance while reducing leaks long-term.
Conclusion
When your dealing with problems in your plumbing, Fixing a leaky faucet is one of the most rewarding DIY tasks. You’ll save water, cut down bills, and avoid bigger repairs expenses. With this guide, you now have the full home maintenance guide to handle dripping faucet repair, faucet stem replacement, and much more. Don’t let leaks win fix them at right time and feel good doing it!
You may also like to read: How to book cheap flights: 10 smart tips

